Wednesday, March 31, 2010

My Nod to Spring

IMG_0577
It’s a little weird that I am sharing my spring vignette with you and it looks like this outside.  But that is Spring for ya, especially here.  Just yesterday I was excited to see the bits of green peeking through my yard and today it’s a full blown winter storm.


IMG_0571


This is just off my garage entry.  We call it the “shoe cabinet” and I usually like to do a little bit of seasonal decor on top of it.  For spring I like a simple, sort of garden-y, cottage-y feel.  A blend of *AsCloseToPastelsAsIget* colors but nothing to matchy-matchy or themed. 


*A couple quick tips for arranging accessories… Vary your heights and colors in such a way that your eye easily follows the flow.  Also, leave some space for the eye to rest.  I like to have a variety of textures and elements that compliment each other. Group like items and try to add interest and your own style.  Play around with your layout and make it feel good to you, that is most important.


IMG_0565


I have my eggs and dollar store moss pieces {LOVE} piled in a sweet patina planter with a wire trellis.  I used to have sweet ivy growing in this but I killed it with my brown thumb it somehow died. :(  I may try again.  Then I got this cute stone urn that had the sweet little bird on top.  It was only $4 and very cute, but as I was putting it into my car I broke the little birdy off.  I was just going to glue him back on but then tried this boxwood bush in the hole and liked it!  So the little bird friend is just hanging out below. 
 
IMG_0573


I have a rustic ‘Home Sweet Home’ sign stuck in the back with a mirror and my little colored glass bottles on a sweet doily to the other side.  I have had these little bottles for 11 yrs!  I heart them.


IMG_0570


For a bit of the unexpected, I hung my dollar store hanging planter with my version of the jute twine eggs, on my lamp with some ribbon.  The planter was black and I painted it and aged it a bit.  On my eggs I wrapped some moss bits and extra vines I had around them.  They turned out really cute, but I am not gonna lie…I added the vines because I did a impatient job of wrapping my eggs and there were some spaces.  I like the final result.  (sorry about the darkish picture)


IMG_0574


I hope you enjoyed my  “Nod to Spring” Vignette.  I hope it is not snowing where you are, and I hope you have a Merry Christmas  Happy Easter!  

I’m linking up with…


Thursday, March 25, 2010

Cottage Garden Spring


I have been busy with lots of wreath orders so my house has been a bit neglected.  I haven't had a lot of time to do fun things around here (that desperately need to be done) to show you.  Oh, and these little people keep calling me "Mom" and need me take care of them...weird, I know. ;)

Lots to come, but for the time being, I wanted to share another one of my Spring wreaths, "Cottage Garden".  As you can see, I love working with the curly willow.  I have mentioned before that I get these from a local farmer who harvests them this time of year.  Once they are gone, they are gone, so I try to use up as many as I can. :)


This one has a nice "cottage-y" feel with the soft colors and simple design including sweet mini Camellia flowers, berries and shabby Dogwood branches.


I hope your home is getting all Spring-ed up and ready for warmer weather.  Happy Day to you! :)

Lots of fun stuff...

giveaways


Wednesday, March 24, 2010

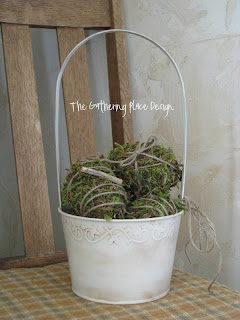
Moss Egg Basket


I am "eggs-tra" excited to share this little project with you. (sorry, I couldn't resist)  I love to make something special for little or no money and I love a challenge.  So when I heard about Living With Lindsay's $5 Challenge, I knew I was down...or up. ;)

The rules are:

- Create a new Spring decor item for your home using only $5 worth of items purchased at a dollar store – i.e. Dollar Tree, Dollar Store, Everything’s $1.00, etc. The $5 does not include sales tax.
- You may use the following supplies *if* you already have them on-hand – paint, glue, paper, fabric, tools.


I went to dollar tree and this is what I got.  A bag of moss,  (as some of you may know, I have a love of all things mossy!)  a bag of plastic eggs, jute twine and a little copper bucket.  Each $1.  I was going to use the egg sign and paint it, but I decided not to.  {I will show you what I did with it later.}

So my total cost was $4!


I painted the copper bucket with spray paint I already had.  Heirloom White, of course, and then put an atique glaze that I already had as well.  I then painted the eggs in a green spray paint I had to make them all the same and add a little texture to hold on the glue and, you guessed it...the moss!
 

Next, I wrapped my twine around the eggs in various ways and then put them in my cute little bucket.  I tied a little twine bow on the side and she was done!  A sweet and simple spring project for under $5.  Who would guess?


Gettin Linky with it...


giveaways

Transformation Thursday at The Shabby Chic Cottage


Categorically Crafting @ Someday Crafts

Tuesday, March 23, 2010

Happy Spring

It was one of those March days when the sun shines hot and the wind blows cold when it is summer in the light, and winter in the shade. -Charles Dickens


That quote is a great explanation of the March weather over the weekend for us!  It looked as if Spring had for sure arrived from inside, but outside it was still a bit cool.  Not complaining. I'll take the sun however I can get it this time of year!  My yard is all cleaned up and ready to start blooming.  I can't wait!!

Loving all the "blooming" I am seeing around from all the talented bloggers.  I've been decorating for Easter and Spring a bit, but haven't got pictures yet.  In the meantime I wanted to share one of my wreaths, "Happy Spring".


I love the color combination in these mini ranunculus flowers adorning the fun curly willow base.  Now I need to get my Spring wreath on my door and finish "springing" up my home.  Happy Spring to you!


Linking Up!


Friday, March 19, 2010

Don't Judge A Painting By It's Price Tag


This is a little lesson on finding the good in things.  This can apply to situations, people or even dollar store items.  Now, a "normal" person may not go art hunting at the dollar store. 
(I do not now, nor have I ever claimed to be normal) But, this is a great example of seeing the potential in things.  I found this little beaut at the dollar store.  It is on an 8x10 canvas and I quite like the picture.  An oil painting replica of sorts with a Italian Countryside, wine country, tuscan feel.  I knew it could be great.


It was a little bright for my liking which also to me made it look a  little cheap. So, I got out my trusty antiquing glaze and gave it a few coats to tone down the brightness a bit and it instantly gave it a more aged, rich look.  Super easy!!   It also needed a frame to give it that masterpiece feel. ;) I went into my little land of misfit home decor and found a nice frame that was missing it's glass.  I love the detail in this frame and it is nice solid wood with a richness to it.  Stuck my beautiful painting in it and...


Not bad for dollar art, eh?  I haven't quite decided where to put it, but it may be the inspiration piece for my master bath makeover.  Mr. Husband and I spent our anniversary last year in Napa and it sort of reminds me of that.  We stayed in a Tuscan style hotel and it was so beautiful.  We had such a great time so maybe this could be a reminder of that wonderful trip.  To think dollar store "art" could be the base of a whole room makeover....Gotta love it! :)  I let you know where it ends up.


I've said it before, think outside the box and get creative with your decor.  Paired with some coordinating items no one would ever guess this was a buck.  Even if they did, who cares?  I like it, it warms my heart, reminds me of good times and that is all that matters in making a house your home. 


Thursday, March 18, 2010

Unique No Sew Chair Cover


I have been working on some items for my Esty store and some other fun spring projects that I will be sharing with your soon.  Including my $5 challenge for Living With Lindsay, which turned out way cute.  I'm excited! 

But, today I am going to share with you a super easy no sew chair cover that I did a couple years ago.  Alright, I have this thing with old chairs.  I love them.  Not sure why,  but they always call to me.  Anytime I see one in a family members garage, I always offer to take it off their hands.  $2 garage sale chair?... It's mine! Then, Mr. Husband asks "why do you love junk?".


This particular fella I believe I stole out of my Mom's garage.  She is so good to me! ;)  It was not necessarily cute nor did it have any extremely interesting detail.  I just liked it.  Oh, it even had a grodey (does anyone say that besides my mom? it means gross. lol) vinyl-ish pleather seat.  Mr. Husband LOVED this one!! ha


It sat around for a bit, until one day I saw a cute little seat redo in a BHG mag. and I thought, 'I can do that...sort of.' ;)


All I did was measure my clearance (love) fabric to the length that I wanted it to hang over the sides and the front.  Pretty much a rectangle.  Then I got out my handy liquid stitch and "hemmed" the edges all around.


Next I laid it evenly and centered across the chair and stapled it to the wood seat frame along the back of the seat.  This fabric is pretty good at hiding the staples because it is sort of quilted, but you could hide the staples underneath.


I then pulled the fabric down around the front legs in a nice pleat and poked two smallish holes through to make way for  my cute coordinating ribbon.  I took my ribbon and wrapped in around each leg then weaved through the holes and tied it in a pretty little bow.  I secured the ribbon on the back of the leg with a staple.


Now for those of you who are concerned about my reckless holes I poked in the fabric, the original instructions said to use grommets. I was just a little too impatient to wait and get them so I did what I had to do. ;)  It works wonderfully!  


I usually like to paint anything I can, but for some reason I liked this as is.  Not to say that there won't be a day it becomes victim to a brush or spray paint can.  But for now it stands.  Sorry the pics are dark and that I don't have step by step pictures, but I hope you get the general idea.


This was really soooo very easy and rewarding.  It has a very sweet unique look and always gets a compliment.  Now if I can just fix that one part so people can sit in it.  Haha j/k...kinda. ;)


Sharing over at The Shabby Chic Cottage for Transformation Thursday!  


And...


giveaways

Sunday, March 14, 2010

Mirror Mirror...


Remember when I did the post showing those dreamy mudrooms?  Well this is one of the reasons.  I still have a hard time understanding why the architect who designed my house did the laundry and garage entry this way, but that is beside the point now.  As I mentioned before I am going to do a few things to improve what is there and be happy with what I have.  This little project is the tiny tip of the iceberg, but I am very excited about it!  You can see above that poor little mirror is heavily overloaded.  We got this in our very first condo 11 years ago and 4 moves and 3 states later it is still with us!  Don't worry my sentimental side won't let her go, but I am going to fix 'er up a bit and give her a lighter load. ;)


I wanted to find a sturdy mirror with hooks.  I knew for a big mirror that I loved I would be paying a pretty penny and I never did see one that had hooks and the functionality we needed.  So of course I have been scouring the thrift stores and I found this puppy.  If you follow me on Twitter you might remember when I found it.  Oh happy day...only $8.95!!  Now I don't know if you can tell, but she is a big old gal!  This great mirror measures 30" x 46"!  I know, right?!  Pretty cool.  In the words of the nice man who carried it out to my car for me, "They are givin this thing to you!"  He was so cute.


So now you might be saying, "did you say great mirror?  really, Krista?"  But just you wait! :)
I promptly removed the wood applique from the top and decided I wanted to fill in the oval too.  Just a little wood filler and sanding.  Don't look too close please, I am a little impatient.

A light sanding all over and she was ready to paint!  I was going to do my staple black, but Mr. Husband helped me decide on a nice color I already had called twig.  I think he just chose the color I said last, but nonetheless, I am glad he helped me out and he is pleased that he played a role in deciding something for decorating our home.  I added an applique on the top and my super cute hooks, sanded and distressed a tiny bit and...


If I do say so myself, I love it!  I had a hard time getting a great pic because I didn't want the horribly messy laundry room or myself in the pictures. LOL  But, I hope you get the idea.


I for sure wanted a mirror here for a couple reasons.  First, to open up the space because it is so tight right there and most importantly, so we can do one last outfit check as we walk out the door of course!  I think the color choice Mr. Husband "helped" choose is great as well to keep the space light and open.


The hooks seem like a splurge when you pay nine bucks for a huge mirror, but they were the detail that I really wanted to give it the over all character and interest I wanted.  I put these cute ones on the bottom.  They were $2 from Pier One and perfect for little hands to hang their stuff.  I feel like the sort of finish off the bottom too, because I think it once sat on a dresser.


I LOVE these cutie-patutie knobers!  I looked on eBay for some antique ones to get that character I was looking for, but I couldn't find what I wanted for what I wanted to pay.  So I found these little replicas at Hobby Lobby!  Aren't they sweet?  I'm sure they go on sale from time to time, but I was feeling really impatient so I paid $3.99 each, which isn't too bad considering.  I simply measured and drilled holes and then screwed these right in.  They work great because they are long.  This gave me enough to make sure they were in good and still have some length to hang coats on.


Finished up,  my big custom mirror cost me around $4o total.  Which in my opinion is not bad at all!  It makes me motivated to finish up my laundry room and storage issues for this little entry.  Check back for updates and best wishes for all your projects!  Oh and for the record, it will look this clean for about 5mins. Just keepin it real. ;)


I'm Sharing...Visit thecsiproject.com


The DIY Show Off


DIY Day @ ASPTL


Funky Junk's Saturday Nite Special