Sunday, November 29, 2009

About

~I believe a home should be warm and inviting.  A cozy, comfortable place where friends and family want to "Gather".

Hi, my name is Krista.
  
I love everything decorating and design.
I love to make something out of nothing and my mom installed the thrill of a bargain in me at a very young age. ;)

 I strive to make my house a home and hope to inspire others along the way. One of my many design passions is floral decor and I have a home based business that is a great creative outlet for me and lets me play. 

I am a romantic who loves a happy ever after.  I love the rain and I have a small obsession with fireplaces & mantels.  I often like enjoying rain and fireplaces together.


I am a cosmetologist by trade who grew up in the beauty biz. I love clothes and hair almost as much as I love decorating. (so you might see a bit of that on here as well)  I recently started a new endeavor creating leather cuffs out of vintage belts, buttons, jewelry, ribbons and lace...you can check them out at www.rustikchic.com

I am a bit weird, a little against the grain, but I think I own it well. I love to laugh and make others laugh.

I have an amazing family who loves me unconditionally and I am lucky enough to be married to the man of my dreams who is also my very best friend! I am mom to two beautiful little girls who make me strive to be my best...they are my world! :)

                                                  ~Thanks to my Momma for teaching 
and inspiring me to create and design.


The Mad Hatter: Have I gone mad?

[Alice checks Hatter's temperature]
Alice Kingsley: I'm afraid so. You're entirely bonkers. But I'll tell you a secret... All the best people are.

Tuesday, November 24, 2009

My Take on the Christmas Kissing Ball...Mwah!


Who doesn't love kisses? Kissing Balls date way back and are a different take of the Mistletoe. I believe they became most popular in the 18th century Victorian Era. ( I am not a historian, so don't quote me;) ) A sign of romance. We all need a little romance right? Here is my take on the Kissing Ball...

You will need a foam ball, ( I think I used a 4 1/2 inch, but you could use any size) hot glue, moss, ribbon and greenery, berries or whatever you want to decorate it with. I re-used a foam ball from another project, and pulled out my bin of "leftovers". You don't need much for this, so saves those scraps from other projects!!

I then started covering the foam ball with the moss. One section at a time, apply some hot glue and then fold the moss over it. I love moss ( in case you didn't know) so I used pa-lenty.

I then pressed it around the ball firmly to form it. If you see places that need more glue or moss, stick it on and then continue to press it around in your hands.

I then took my ribbon, again leftover from a bigger project, and started at the top and wrapped it around to the bottom. Once it is down to the bottom, twist it around itself and then wrap up around the other side, back to the top. Kind of like wrapping a gift. (if this is making any sense at all) The amount of ribbon depends on the size of your ball and how much of a drop you want it to hang. (my hands always look so weird in these pics)

Back at the top wind it underneath your starting point and tie a knot. I leave on end longer than the other because this will be my hanger. You could definitely loop even ends up to hang as well and even tie a pretty bow at the top. The possibilities are endless!! I like to use wired ribbon so I can manipulate it a bit.

Once you have it tied, you can even it out around the ball and even take a pin or a dab of glue to anchor it.

Now for the fun part! You can use pine, holly, mistletoe, ivy. Whatever you have will work...no rules here! ;) Some of these are stuck in the foam, other glued on.

I had this great ornament that broke (of course I saved it) and it had sweet little red pine cones that I used as my "berries" for this project. Simply glued around the top. Ooooh, one day I'll show you what I did with the other broken ornament!!

I then added in some other smallish pine cones along with some more greenery from my "leftovers" bin. (yay!)

I kept adding and playing, playing and adding. I found some green berries in my bin to compliment, some more pine and smaller pieces of ribbon looped through. And...........
(drum roll please)

Here she is in all her Romantic Festiveness!

I think it turned out quite nicely, so I took lots of pictures for ya!

So, all and all pretty simple right? But a great way to add some romance to your holiday decorating!

You can hang them lots of different places. You could even stick them in your tree or hang them from your garland. Inside, outside on your porch, it's up to you! Or, what a fun hostess gift!

No fear decorating here. Just go for it! Everyone is their own worst critic. Don't analyze things to much and again, if it makes your home feel warm and inviting, you've done good!


I'm sharing at...


The DIY Show Off


DIY Day @ ASPTL

Saturday, November 21, 2009

Kitchen Backsplash Makeover

The DIY Show Off

I love my kitchen, but it did not have a back splash. That is something I always wanted to change. I really like tin tiles and I had looked into a couple different places to purchase them and they were kind of pricey and I would have to hire someone to install them. I found these faux tin tiles at Lowe's and they are awesome! At $18 per panel, you can't beat it! I bought them seriously about 9 months ago and they have been sitting ever since. (Gotta love it!) Well, I said I was now ready to do some updating, so here you go. Oh, and this won't be the last of it!
Before.
Before.
And... AFTER!
These were way easy to work with. The hardest part was the measuring and making sure the lines matched up. (I will say, measure twice, cut once ;) ) They come in 18"x 24" sheets and I just used utility scissors to cut them. You could use a utility knife as well. They really look so much like real tin! Everyone who I have shown can't believe they aren't.

I used liquid nails to attach them to the wall. It didn't take much because the tension between the cabinets and the granite helps to hold them in place. Easy breezy! :)
The color and design adds so much warmth and character to our kitchen. I am sooooo excited with how it turned out! And even more that I did it all by myself...woo hoo :) Also, don't be afraid to mix finishes and types of wood. You might feel like everything needs to be the same. I'm not a huge fan of matchy matchy. In our kitchen, I have two different stains on my cabinets along with black painted pieces. As well as stainless steel and oil rubbed bronze finishes. Mixing different finishes just adds interest and gives your home it's own unique feel. Do want feels good to you!

I had some scraps left over so the bread box could not escape my embellishing! Don't you worry there will be more projects to come with the other trimmings. ;) I hope this ispires ya'll to get going with things you have always wanted to change or update in your home. I'm not gonna lie, I was intimidated to take on this project, but the end result is worth it for sure!


DIY Day @ ASPTL

Wednesday, November 18, 2009

Super Lovely Christmas Star...Made From LEFTOVERS!


I love to make these cute decorative stars. They make a great accent piece with any decor throughout the season. Here is a quick and easy Christmas Star!
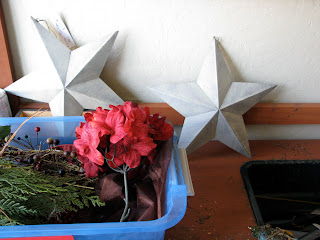
Alright. Confessions time. I don't like to throw anything away because "I might need it one day". ;) Seriously, my mother-in-law calls me everytime Oprah has that show about hoarders. LOL! I admit sometimes you need to throw things away but here is an example of what you can do with all that "crap". ( as my husband so kindly calls it ) Above you will see a nice little bin (me being organized!) where I keep some of my Christmas leftovers. I grabbed that and a star I already had...I'm sure I found on clearance somewhere! Ohhh Yeeaahh!!

Lets dig in. I found a sprig of twigs already bunched together. I attached this to the star with wire and hot glue and... some more hot glue. Now I have an anchor of sorts. Check out this perfectly wonderful pine I found!!
I stuck 3 sprigs of the pine under the wire with some more hot glue. Because it is flat, this pine makes a great backdrop. Next I found a couple little pine cone fellas. I tightly wrapped the stem with my green pipe cleaner and wound it back down to make it a little sturdier. (word?)
I wedged it down in the wire among the twigs and pine, with some hot glue. ( I love me some hot glue!) Then, a favorite trick of mine, covered my tracks with moss. Have I told you I love moss? I do. Look how it hides everything and looks great!
Now for a pop of color an orphan hydrangea bunch. I snipped of individual stems. This way they are light and easy to tuck in there with yet some more hot glue.


Time for the other pine cone friend. I used the other half of the green pipe cleaner to attach him in.
Cover with some more moss...
Add in some leftover berries for some more color.
Then I found a remnant of gorgeous brown tulle that I wrapped around the star, over the wire from the beginning, and tied it in a knot. A bit of hot glue will hold it in place. Trim up the ends and look for any place you might need some more moss.
I decided it needed some cinnamon sticks I found. Wrapped these together with pipe cleaner. To add a little more color and sweetness, I tied a bow around these before I stuck them in.
Ta da! Pretty cute eh?
This fun project took me about 15-20 minutes. For real! There is no wrong or right and don't judge it until your finished. Have fun with it and give it your own flair! :)
You can tuck this little star anyway in your Christmas decor. On a shelf, under the tree, in the tree or even on top of your tree!
Or, what a super cute gift!
Here is another one. Again made from just leftovers! :) What do ya think of this "crap" now, honey? Bwahhahahaha ;)
I will definately be posting more ideas on using leftover items, so hang on to some of those scraps! You never know!


I'm entered in the See Mommy Sew Tutorial Contest!


The Shabby Chic Cottage

Tuesday, November 17, 2009

TGPD's Version of the Tomato Cage Christmas Tree


Most of the time when friends and family come to my house they enter from the back patio. Because of this, I like to decorate it as much as the front door. I really wanted to get some pre-lit potted trees last Christmas on clearance (love it) but I didn't. I could just kick myself...what do ya do? So, I decided I was going to just splurge and buy them. Until...I pulled in my garage one fine day and spotted my tomato cages! I planted tomatoes a few years back and, well anyway, there they are. I decided I would save the money and make my own trees and place them in the pots that I had flowers in this summer. Good girl, Krista! I am sure you have seen these made before, but I thought I would share my version with you.

So, I got my cages. You could spray paint them green if you wanted, but I left mine silver. Then you just need a basic pine garland. I had a few extras hanging around. I had to buy a couple for $2.99. I ended up using 2 6ft garlands for each. Take the time to first "fluff" them and straighten the pine out. It makes a big difference. After wrapping the points of the cage with a green pipe cleaner, I took the end of the garland and wired it around the top of the cage.

I wound it down tightly together. I've seen it would loosely giving the tree a spiral look, and it looked great as well. Totally up to you. As you go down the cage you can take individual pieces of the pine and wrap them around the cage to hold it in place. I adjusted and spread the pine out as I went.
Next, I took a strain of 1o0 lights and wrapped it down my new little tree. :) Hooking it on a few individual pieces as I went.

I took a bag of pine cones and attached some here and there with wire. The bag had some grapevine balls I stuck in as well. I had a pretty beaded berry garland I got at Target on clearance (my fave) last year. I cut it in half, to have one for each tree, and wound it down the front of the tree.
I then grabbed my planters, dirt and all, and put em in...perfect fit! I took some sturdy wire and looped it around the cages and stuck it in the dirt to secure them. I am sooo excited with how these turned out!! The pictures don't really do them justice. (if you don't mind me saying) Even my husband is impressed. He can't believe they were made from tomato cages!
Instead of spending $100+, I spent less than $20 for two awesome patio trees using mostly things I already had!! So go for it! Grab your tomato cages and make you some trees!
These were way easy and fun to make. Seriously took me 30 minutes to make and put a smile on my face! :) I can't wait to show you how they look with my outdoor decor. Coming soon!!

I'm participating in...

The DIY Show Off


Funky Junk's Saturday Nite Special