








Showing posts with label spray paint. Show all posts

Friday, June 3, 2011

Simple Playroom Art~On the Cheap

 IMG_2010
I really am going to finish our playroom one day…PROMISE!  Here is some more proof that I am working on it.  This was soo easy and under $5 for all three!
IMG_2005
I had a few 12” x 12” boxes that I was hoarding had saved from some frames I bought on Ebay.  I spray painted them in a sweet yellow and then attached this too cute scrapbook paper to them with Mod Podge.
  IMG_2011


Next I attached some doilies I had with small dabs of hot glue.  {You can find these at the dollar store as well.}  A few little paper flower embellishments in the centers and that was it.  Easy right?  I think they turned out pretty cute and I am feeling motivated  to get moving on the rest of the playroom.  afterweplayatourlakehousethisweekendthatis;)
IMG_2009


**~If you want to check out some of the other progress in our playroom, you can click {HERE} & {HERE}   .~**
Happy Weekend!!! :)

Tidy Mom
A Little Knick Knack

Monday, April 25, 2011

Lovely Little Desk

IMG_1455 IMG_1451 IMG_1458
I have mentioned before that I am {slowly} working on turning our guest room into a playroom.  I’ve completed a few projects here and there so hopefully soon it will all come together.  One more project down…
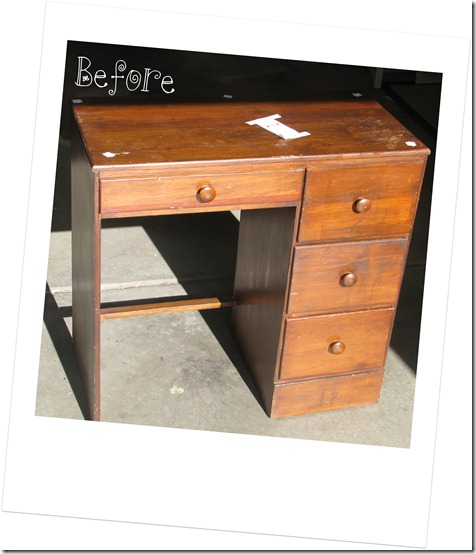
I found this little desk for $5 at a thrift store and I thought with a little love it would be a perfect little homework or art station.  Beautiful, right? ;)
IMG_0340-1
A little sanding, painting, wood appliqué-ing distressing, and cute {clearance} knob-afying later…  
IMG_1448-1 
Isn’t she sweet?
Almost makes me want to pull a little chair up and write a poem or short story.
 IMG_1449
I applied the little wood appliqué on the bottom because it was just screaming for one, plus I wanted to feminize it a bit.
*TIP-Adding appliqués like this is a great, inexpensive way to add character and customize your thrift store pieces.  Also, I stained the appliqué first to match the wood on the desk so when it was painted and sanded it would look the same color as the rest of the desk.
IMG_1456
I used a few coats of flat white spray paint to cover.  Then I sanded the edges and added some glaze to give it more antiquing.  The precious little knobs were a steal at TJ Maxx.  (Like $3 for all of them.) LOVE.
*TIP- Unique knobs make a huge difference…check out the before with the basic wood knobs.  By simply adding some color and detail with knobs, this piece takes on instant charm with a whole new look. 
 IMG_1453IMG_1452
 
Stayed tuned for the completion of the playroom transformation…
but please don’t hold your breath;) 
*If you have any tips on how to stayed extremely focused on one room at a time…please send them my way. ;)
Linking up to… 

Centsational Girl’s All Things Paint Party
Primitive and Proper Piece of Work Wednesday
Domestically Speaking
Make it Yours @ My Backyard Eden  


HOGFurniture Feature FridaysPhotobucket 

Have you entered my Spring Wreath Giveaway yet?!
IMG_1247

Tuesday, March 1, 2011

A Little Spring Spruce Up

IMG_1279 
Here is an EASY update for a functional {but otherwise boring} mail holder.  I was garage sale-ing with my Grandma and we found this little guy for $1.00.  It holds mail and opens up to house keys as well.  She thought it would be nice on her desk.  But, sorry Grams…it’s non cute.  
So…..
IMG_1196 IMG_1199
By simply gluing on a wood appliqué it already looks better, right?
I then painted and sanded it and added some glaze.  I took out the photo holder and added some burlap and a sweet sticker and slid it back under the cover.
 IMG_1277  ‘
There you go…
A simple, fast update to make a boring desk accessory more pleasing to the eye. :)
Head on over for some more inspiration….
this blessed nest
PhotobucketShow and Tell GreenDomestically Speaking
Get Your Craft On Tuesday

Saturday, October 9, 2010

BOO! Platter for a Buck

IMG_0700
This is super easy…
You’ve probably seen a variation of this before.  I bought a plastic patter for a dollar.  Next I typed out the word boo and then hit the mirror image button on my program.  Printed it out on a full page sticker and then stuck in on the bottom of my platter so on the top it said boo correctly.
IMG_0676  IMG_0677  
I then spray painted the bottom of the platter black and let it dry.  My initial intent was to remove the letters so it was clear, which looks good too, but for now left the white stickers on.  I might try remove the stickers and stick some scrapbook paper in the back so it shows through the clear words…lots of fun options with a project like this.  Nothing too ingenious or spectacular, but I do enjoy the end result.
IMG_0678  IMG_0695
Haha.. After I finished this  little project I ran around my house hiding behind corners and jumping out in front of my kids and Mr. Husband and holding up the platter and screaming BOO! …yes I am weird.

Thursday, September 16, 2010

{Just} A Cake Stand

IMG_0228
I love cake stands and I really only have one, which is weird….anyway, I have loved seeing all the amazing repurposing of things to make unique cake stands.  So, here is another one.  Nothing too crazy cool or spectacular,  but pretty cute for very little time or money. And now I have two cake stands!
IMG_0209
I had 2 little votive holders that I bought from the dollar store a while back.  Because they are from the dollar store, they were sort of irregular, which in this case was wonderful!  One of the bottoms was smaller so it fit perfectly in the other, so I Gorilla glued them together and then placed my old {like first married old} metal charger plate on top.  Throw in a little ORB spray paint to unify the look,  and what do you get?…
IMG_0226
A super lovely -using what you have- dollar store -one of a kind -cake stand!
IMG_0227
I am not sure where she will end up, but I borrowed this little arrangement from my Etsy Shop to show you one way it could be used.
* My sincerest apologies about the dust in these pics that is driving me nuts!!  So please ignore. ;)
IMG_0225 
Do you have a fab cake stand you’ve created?
Gettin’ Linky with it…
giveaways A Little Knick Knack

Wednesday, August 18, 2010

Functional & Fashionable

IMG_1711

My paper towel holder had seen better days.  I have grown tired of looking at it everyday in it’s not so pretty state.  I have been looking for a new one that A. I like and B. wasn’t too pricey.  Then I had a fab idea.

Here is a quick  {seriously, like 15 min} update that is sooo simple.

   IMG_1702IMG_1704

See the poor gal in her before state.  Tired, worn and used probably 20+ times a day for 6 years.  I had this extra curtain rod finial floating around and decided it would make a perfect topper.  I just Gorilla Glued it onto the existing top. This way we can still unscrew it to put the roll of paper towels on.*  I love the shape and how it adds some character to a utilitarian item.

*This may be common sense to you, but I could just see myself gluing it to the wood part and then not being able to put the roll of towels on.  Needless to say, I am a little proud that I was using the old noggin…  Today anyway. 

IMG_1709

So here is why I love spray paint… 

Just a couple coats of this easy-to-apply-magic-in-a-can, and you give a combination of different finishes and colors a totally uniform look.  No one would ever know that I didn’t purchase it this way.  In less than 15 minutes I  gave it a high end look for fa-REE!

  IMG_1710

Gettin linky with it…

Visit thecsiproject.com

FrugaliciouFridaybutton-1